Asset management
Last updated: Apr-23-2025
As an Assets administrator, you can perform several tasks related to asset management.
Some of these tasks involve configuring options that enable functionality for your users, and others involve managing assets directly:
-
Creating named transformations: Create sets of pre-defined transformations that can be used for:
- Transformation templates (previously known as presets), which enable others to easily apply named transformations to assets.
- Strict transformations, which free selected named transformations from certain security restrictions.
- Configuring access control: Determine who can access an asset and when.
- Moderating assets: Moderate assets when they're uploaded to keep unwanted content out of your system.
- Register for add-ons: Enable add-ons to extend your Assets functionality.
- Requesting external uploads (Beta) (free plan only): Share a public link to grant external upload access to a selected folder.
Named transformations
A named transformation is a pre-defined set of transformations saved with a name for easy reference and reuse. Named transformations enable you to apply several, possibly complex transformations with one concise name. When used in delivery URLs, named transformations shorten the URLs and the descriptive names can improve SEO.
Additionally, you can set named transformations as transformation templates (previously known as presets) and strict transformations, which enable additional functionality:
Especially useful for an Assets administrator, setting a named transformation as a transformation template enables your users to apply that named transformation to assets as templates for preview and/or download at the click of a button.
You can also allow a named transformation for a strict transformation. The Strict transformations setting prevents end users from dynamically applying transformations to media assets by changing their URLs. If this setting is on, you can allow dynamically applying specific named transformations as exceptions.
You can coordinate with developers on your team to create and manage named transformations programmatically, or you can create and manage named transformations in the Console using the Transformation Builder (Beta).
- Keep in mind that not all transformations support all asset types and formats. Applying a named transformation to an asset of an unsupported type or format will fail and you won't be able to deliver those assets. You can check whether you can use the all parameters in your named transformation for both images and videos in the transformation reference. You can also check the supported formats for transformations.
- Before you update the transformation parameters of an existing named transformation that's already used in your production assets, make sure you're aware of all existing instances. To mitigate risk, when you update the parameters of an existing named transformation (whether via the Console UI or API), existing derived assets (already generated copies of an asset with the transformation applied) using the named transformation are not automatically invalidated and regenerated.
If you're sure you want to apply the new definition to any already derived assets with that named transformation, a developer must specifically invalidate those transformations so that the asset will be re-derived using the new definition the next time anyone tries to view it in a browser. - Before you delete an existing named transformation, make sure that transformation isn't currently used in production. When you delete an existing named transformation (via the Console UI or API), and if there are fewer than 1000 existing derived assets using that named transformation, they're automatically invalidated and will return errors when next requested in a browser.
If there are 1000 or more such derived assets, you'll get an error and you won't be able to delete the named transformation until a developer invalidates the existing derived assets.
Creating named transformations
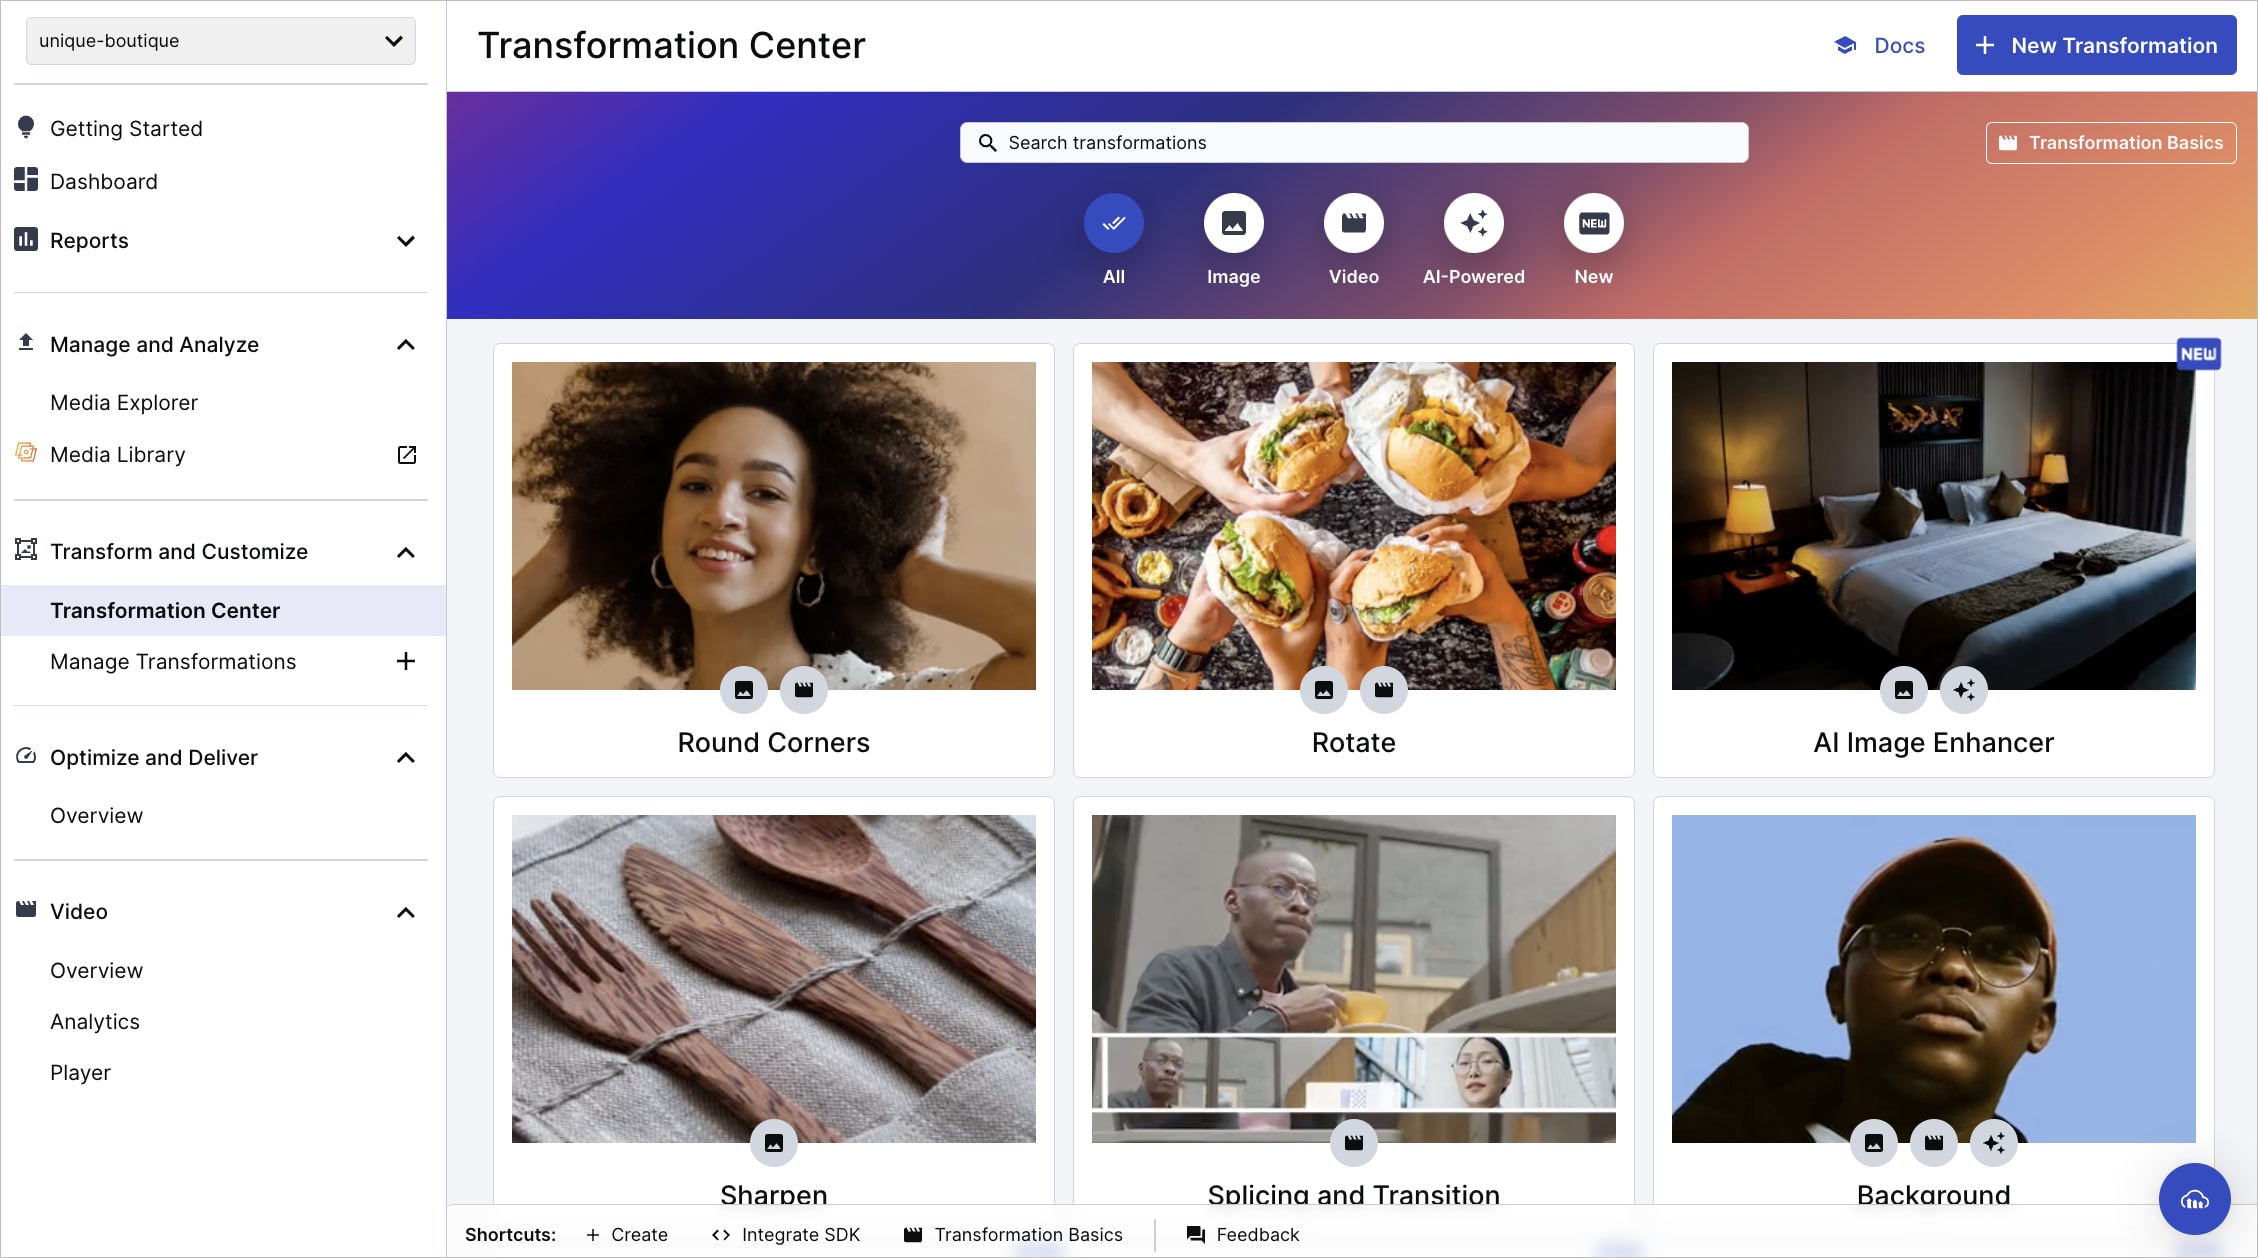
You can create a named transformation from the Transform and Customize section, accessible in the Console Product Navigation menu.
To create a named transformation using the Console, you have a few options:
- Start with a transformation from the Transformations Center as a template and experiment with it in the UI, click Use it to open the Transformation Builder and refine it to your needs, and finally save it with your chosen name.
- View all your delivered dynamic transformations (those that were generated and delivered on the fly) in the Log tab of the Manage Transformations page and save one of those with your chosen name.
- Create a new transformation from scratch using the Transformation Builder (Beta) and save with your chosen name. Open the builder by clicking New Transformation from either of the Transform and Customize pages.
- Must contain valid UTF8 characters only
- Must not contain more than 1024 characters
- Must not contain any of these characters:
\,/,?,&,#,%,.,,,<,>
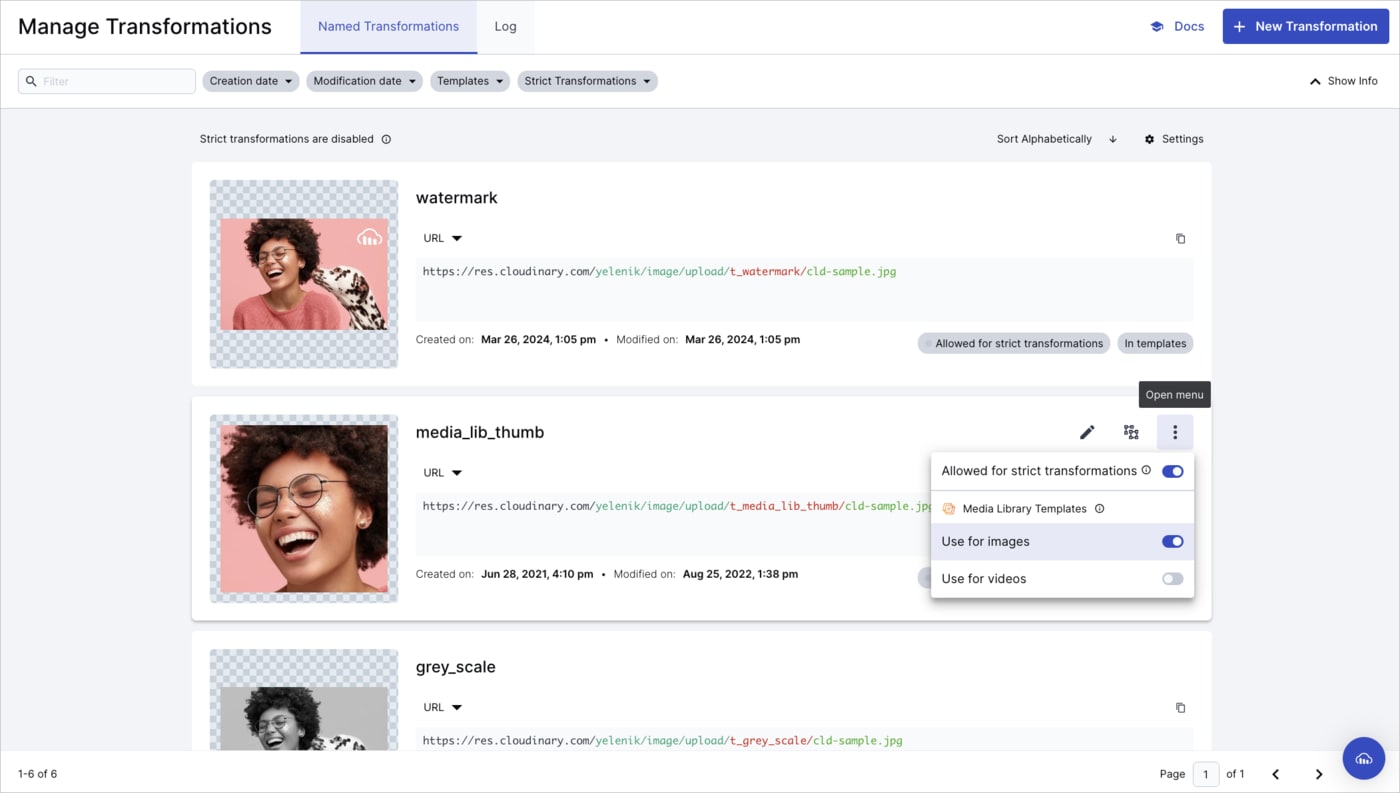
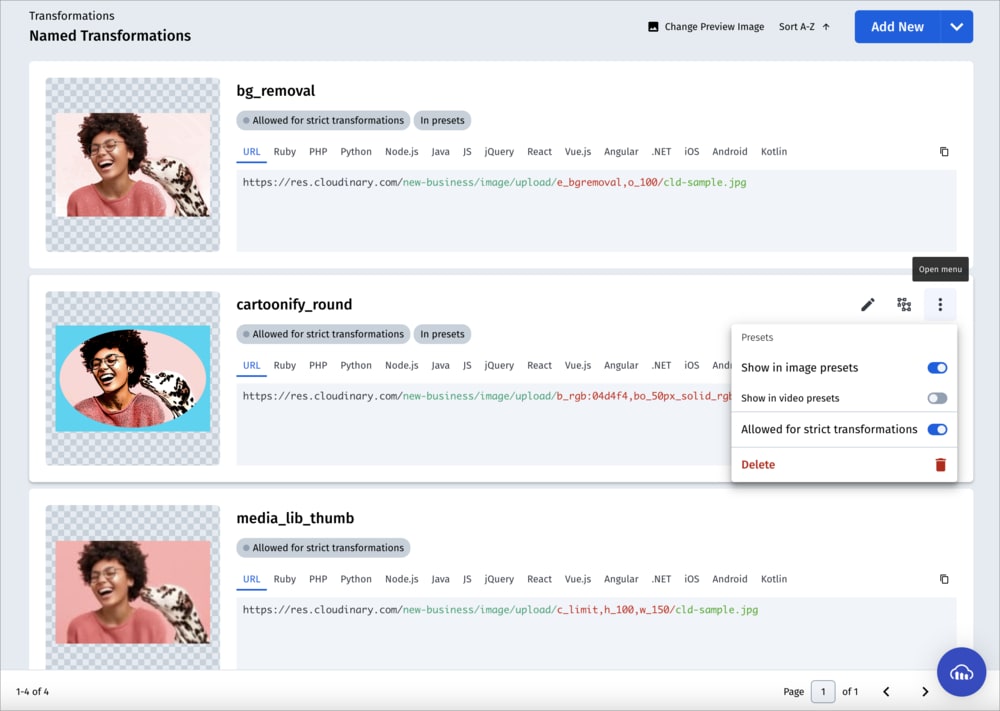
Once you've saved your named transformations, you can view a list of them on the Named Transformations tab of the Manage Transformations page of the Console.
To access the page:
- If you have the new App Console, the page is part of the Image product: Image > Manage Transformations .
- If you have the Classic Console, go to Programmable Media > Manage Transformations.
From here, you can edit or copy the named transformation.
You can also select to include a named transformation as a transformation template, so they can be used as templates in the Media Library, or to allow a named transformation for strict transformations.
Transformation Builder (Beta)
The Cloudinary Transformation Builder UI is designed to help you create and save your transformations in a simple and easy to use way. Open the builder by clicking New Transformation from either of the Transform and Customize pages accessible from the Product Navigation menu.
Here are some of the features and functionality you can get by using the builder:
- Simple and intuitive UI for selecting and configuring transformation actions - easily discover actions and parameters as you build.
- Transformations built as a series of self-contained actions so you can see the results of each one as you apply it.
- Ability to update the default preview image to something from your own Media Library.
- Developers can copy URL and SDK snippets directly into their code.
Transformation templates
A transformation template (previously known as a transformation preset) can be applied to an asset to generate a copy modified according to a set of pre-defined transformations (i.e., a named transformation).
Transformation templates can be applied in the following contexts:
- Assets users can preview assets with a transformation template applied, download those assets, and download their transformed delivery URLs using Studio. In addition, administrators can use this tool to create and edit transformation templates.
- Assets users can preview an asset with transformation templates applied from the Download Options tab of the asset management drill-down page to see how the selected asset would look with those transformations applied. Users can perform operations such as opening the displayed asset in a new tab, downloading it, copying the URL, or, if you have Assets, further editing the transformation.
- Assets users can download one asset or multiple assets with a transformation template applied in the Media Library.
- Depending on your account or product environment setup, external stakeholders may be able to download assets with transformation templates (presets) applied from dedicated collection web pages and basic portals accessed via public links. This functionality enables modified assets to be shared with external stakeholders instead of originals.
Several transformation templates are provided by default, and you can replace these with your own by setting named transformations as transformation templates, or saving transformations created in Studio as templates, up to a maximum of 60.
- Any user can create transformation templates directly from within the Media Library, albeit with fewer transformation choices, by utilizing Studio.
- Keep in mind that transformation templates may be applied to assets by other users and not all asset formats are supported for transformations. If an asset's original format doesn't support transformations, applying transformation templates to it will result in an error. See a list of supported transformations.
To set an existing named transformation as a transformation template:
- In the Named Transformations tab of the Manage Transformations page in the Cloudinary Console, hover over the named transformation you want to use as a transformation template and open the menu using the kebab (3-dots) icon.

- From the menu, turn on the Media Library Templates Use for images or Use for videos options. To ensure that your transformation templates are valid:
- Make sure that named transformations that you set as a video templates only contain transformations that are valid for videos, and that those that you set as image templates only contain transformations that are valid for images.
- Make sure the transformation doesn't include any user-defined variables.
- Transformation templates can be a convenient way to see how an asset may look with different levels of compression applied. To create a template for this purpose, create a new named transformation, set the Quality option to the desired compression level, and give the named transformation an appropriate name, such as "Good quality mode" or similar. Then select the Media Library Templates Use for images or Use for videos options as described above. You can select Auto for your quality setting and Cloudinary will automatically apply the compression that achieves the optimal balance between file size and visual quality to your asset.
- When you click a transformation template in the Management drill-down page to preview an asset with that template, it doesn't count against your transformation quota. However, the first time someone views that transformation template for a specific asset outside the Media Library (open in a browser tab, download, etc.), a derived asset is generated and counts like any other asset transformation.
- You can make transformation templates (presets) available from dedicated collection web pages and Media Portals accessed via public links. When available, external stakeholders accessing dedicated collection web pages or portals can download assets transformed by a template, instead of, or in addition to, being able to download originals.
Keep in mind that external stakeholders won't be able to preview the transformation templates. Use descriptive names to make it easier to anticipate what the transformation templates will do.
Studio
Studio provides a user-friendly interface for applying transformations and AI-driven actions to multiple images at once, generating variations for download, and copying the transformed images' delivery URLs.
Administrators can create new transformation templates in Studio. Once created, these templates are available for users to apply within Studio, as well as any other context that named transformations set as transformation templates can be applied. In addition, templates created within Studio are displayed on the Named Transformations page of the Console, with the Media Library Templates Use for images or Use for images options selected.
Templates created within Studio can be used as a base for new templates and are editable.
Named transformations set as transformation templates for images are available in Studio for users to apply. However, they can't be used as a base for new templates and aren't editable.
Watch and learn: Manage templates in Studio
Read how to: Manage templates in Studio
To create a new transformation template in Studio, open Studio and add one or more images, apply AI-actions and transformations, and click Save Transformation.
To use a templates as a base for a new template, click Templates, select a base template, add or remove AI-actions and transformations, click Save Transformation, and then select Save as New to save the edited template under a new name.
To edit templates that were created within Studio, click Templates, select a template, add or remove AI-actions and transformations, click Save Transformation, and then select Save Changes to overwrite the original template.
To deselect a template, click the reset button next to the Templates title.
For more information on using Studio, see Studio in the User Guides.
Strict transformations
When transformations are added to Cloudinary asset delivery URLs the transformed assets are generated dynamically, meaning that if the requested transformed asset does not already exist, then it is created on the fly. This is a powerful feature, but you may not want your end users to play with these options on your assets.
Enabling the Strict transformations setting prevents unexpected transformations from being charged to your account by blocking end users, who have access to your delivered assets via your website or app, from dynamically generating transformations on them.
If this setting is on, you can allow specific named transformations to be used dynamically as an exception.
Enable the Strict Transformations setting in the Security page of the Console Settings. To mark a specific transformation as allowed, open the Named Transformations page of the Console. Next to each transformation you can open the menu and toggle to either allow or restrict the transformation.
Access control modes
When working with Cloudinary's API, there are a few ways you can control who can access an asset and when. These include:
- Storing an asset with an
authenticatedorprivatedelivery type. - Applying the
access_controlparameter.
If the first option above is applied on an asset, the asset's current access control mode is indicated in the Media Library with an icon, but you can't apply or modify the setting via the Media Library. It can be applied or modified only programmatically via the API. For more details, see Media access control on delivery.
The access_control option can be set programmatically via the API or via the Media Library.
Enterprise plans:
- The access control mode feature is a premium offering for Assets Enterprise plans, and its availability depends on your account setup. If access control mode is not yet enabled for your account and you'd like to enable it, please contact your Customer Success Manager.
Free plan:
- This feature is unavailable on the Assets Free plan. For more options and information, contact us.
Setting access control from the Media Library
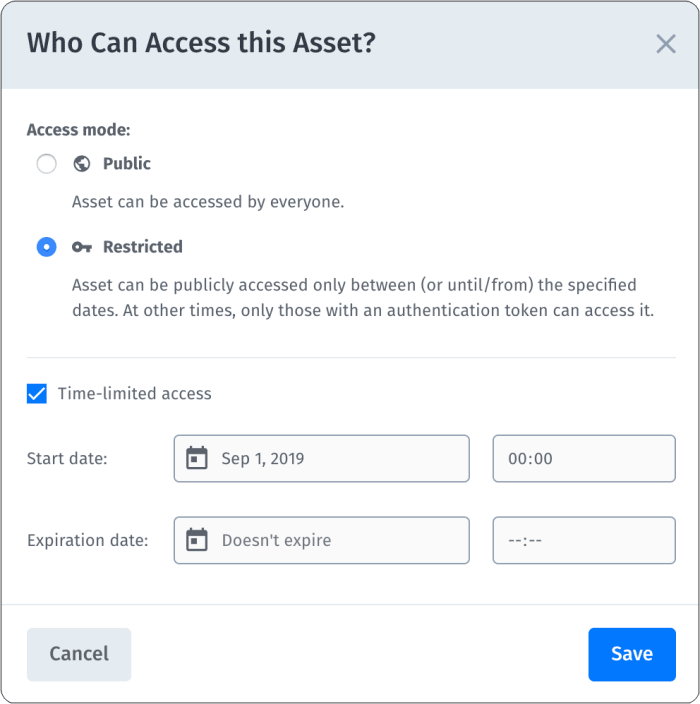
If the access control option is enabled for your account or product environment, an Assets administrator can change any asset's access control mode between Public and Restricted directly from the Media Library.
Setting an asset as Restricted means that people can only view that asset outside the Media Library if they have both the asset URL and an authentication token (a special type of validation for ensuring that a person requesting a URL is allowed to access it). Downloads are also restricted if you've turned on the Block restricted asset downloads option in the Early Access page of the Media Library Preferences. The restrictions applies except during an optional time-limited date range when the asset is defined as publicly accessible.
If your users need to allow someone access to a restricted asset via a URL, outside the time range that an asset is set as public, work with the developers on your team to generate and distribute the required authentication token. For more details on authentication tokens, see Authenticated access to media assets.
Time-limited restricted access can be useful if you have an image or video that's intended to be used for a special campaign or that shows a new product design, and it's imperative that the asset will not be shared outside the organization prior to an official launch date. Or conversely, you may have assets that you no longer want the public to be able to view or share after the content is obsolete.
When working with the access_control option, you can change assets from public to restricted, and add or change the time-limited access dates or times without changing the asset's URL in any way. This means that your developers don't need to change the URLs in their code when the access settings for that asset change.
To view or modify access control settings:
-
For a single asset, open the access control settings dialog box (shown above) by clicking the Public
 or Restricted
  access control button in one of the following locations:
- The Summary tab of the Media Library Preview pane
- The Asset Management Summary tab
-
For multiple assets, select the assets you want to update and choose Set Access Control from the (3-dots) option menu on the assets toolbar.
NoteYou can update access control for up to 300 assets at a time, including any derived assets generated from the originally selected assets. Derived assets are generated when you apply transformations and then use the resulting variations outside the Media Library (open in a browser tab, download, deliver in a website or app, etc.). From the dialog box that opens, you can view or change the access control mode between public and restricted, or adjust the time-limited access for restricted assets.
When updating multiple assets, you'll receive an email notification upon completion, including a list of assets that couldn't be updated, if there are any.
Uploading with access control
If the same access control settings need to be applied to a set of assets being uploaded to the Media Library, you can configure upload preset(s) with the desired restrictions. Set the upload preset(s) as the default Media Library upload presets, and the required access control settings will be automatically applied to the assets being uploaded.
If you don't want to set the upload preset(s) as the default Media Library upload preset(s), users may be able to apply restricted access control settings by uploading assets via the Media Library Upload Widget and selecting the Upload Preset with the desired settings.
Automatic and manual moderation
It’s sometimes important to moderate assets uploaded to Cloudinary. For example, you might want to keep out inappropriate or offensive content, reject assets that don't answer your needs (e.g., making sure there are visible faces in profile images), or make sure that photos are of high enough quality.
Assets can be marked for moderation both through the UI and programmatically during the upload flow. For more information on programmatically marking assets for moderation on upload, see Moderation of uploaded assets.
You can apply one or more of these moderations to your incoming assets in a single upload action:
-
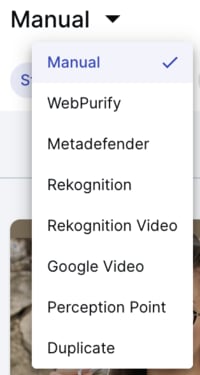
Automatic moderation: You can register for a variety of add-ons that provide different automatic moderation functionality:
- Webpurify: Human moderation experts reject adult-oriented or inappropriate images.
- Perception Point: Detects and prevents advanced threats by incorporating multi-scanning and controlled data workflows.
- Amazon Rekognition: Rejects images with adult-oriented or inappropriate content using deep learning algorithms.
- Amazon Rekognition (Video) and Google Video Moderation: Reject videos with adult-oriented or inappropriate content using deep learning algorithms.
- Duplicate Image Detection: Prevents duplicate images from being uploaded.
- Manual moderation: A Cloudinary moderator must personally review, and accept or reject, assets marked for manual moderation from the Moderation page. From there, the moderator can actually review all assets marked for moderation, per moderation type and status, and override a decision made by any one of the automatic moderations.
When an asset is sent for moderation, it's marked as Pending as soon as it's uploaded. For automatic moderations, the resolution time can vary based on the asset and moderation type. For instance, large videos may take longer to process, while average-sized images are usually moderated almost instantly with algorithm-based add-ons. If an asset is subject to multiple types of moderation, the overall process duration depends on the time taken by each individual moderation to complete.
Marking assets for moderation
You can send incoming assets to be moderated automatically or manually.
To mark assets being uploaded for moderation:
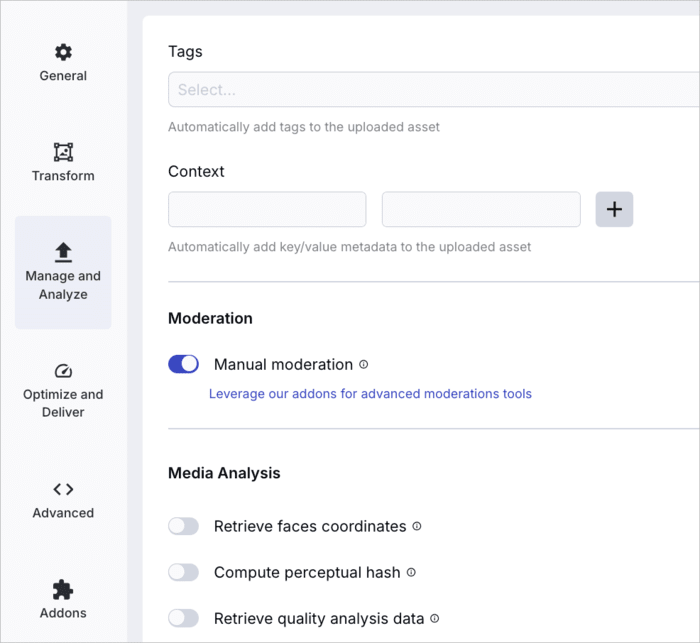
- Go to the Upload Presets page of the Console Settings.
- Add a new upload preset or edit an existing one from its (3-dots) option menu.
- Select the Manage and Analyze tab to enable manual moderation.
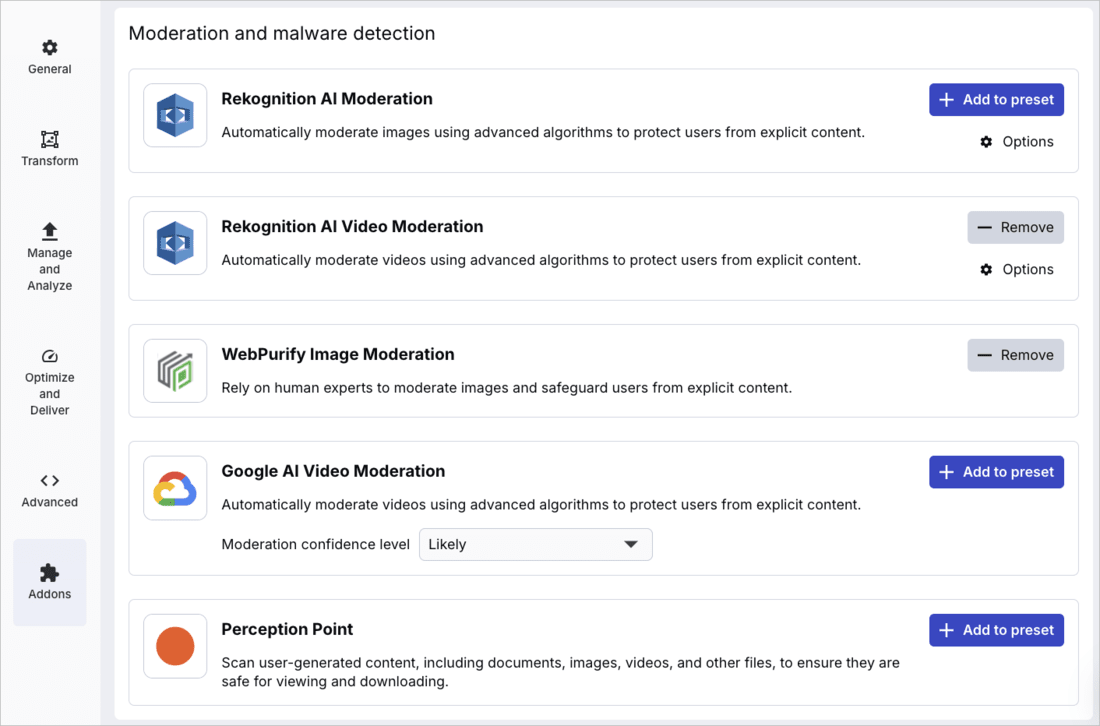
- Select the Addons tab, and select one or more of the moderations listed:
Notes
- Make sure you're already registered for its corresponding moderation add-on, or assets uploaded using that preset will fail.
- When defining an upload preset that may be used for both image and video uploads, you can select both image-specific and video-specific moderations and only the relevant moderations will be applied when a file is uploaded with that preset.
- The order in which the moderations are listed dictates the order in which the moderations are applied to uploaded assets. For example, if you select the Amazon Rekognition and Duplicate moderations, Amazon Rekognition will be applied to uploaded assets before Duplicate. When selected, Manual moderation is always applied last.
- There are two ways to apply the moderation to assets being uploaded: Apply the moderation automatically to all the assets uploaded to the Media Library by setting the upload preset with the desired moderation settings as the Media Library upload preset. ORChoose if you want to apply the moderation to assets during each upload. To apply the moderation, upload assets via the Media Library Upload Widget and select the Upload Preset with the desired moderation settings from the Advanced drop-down.NoteDepending on your product environment setup, the Upload Presets option may not be available in the Advanced options of the Media Library Upload Widget. If the option isn't there, you can submit a support request to activate it.
Applying multiple moderations
You can mark assets for more than one type of moderation in a single upload action. This might be useful if you want to reject an asset based on more than one criteria, for example, if it's either a duplicate or has inappropriate content. In that case, you might moderate the asset using the Amazon Rekognition as well as the Duplicate moderation.
Status when applying multiple moderations
Each of the moderations selected is, in turn, applied to the uploaded asset. The status of the asset for all moderations is set to pending immediately on upload, and changes to accepted or rejected for each of the moderations that's applied.
The selected moderations are applied and resolved one by one, until either:
- All selected moderations approve the asset, in which case the final status of the moderation is approved.
- One of the moderations rejects the asset, in which case the final status of the asset is rejected. The process ends and the remaining moderations are never applied. There's no way to resume moderation once an asset has been rejected.
- The asset is manually accepted or rejected. This can be done at any point in the process, regardless of the asset's status and whether the asset was originally marked for manual moderation. A manual decision always overrides the automatic ones.
Moderation history
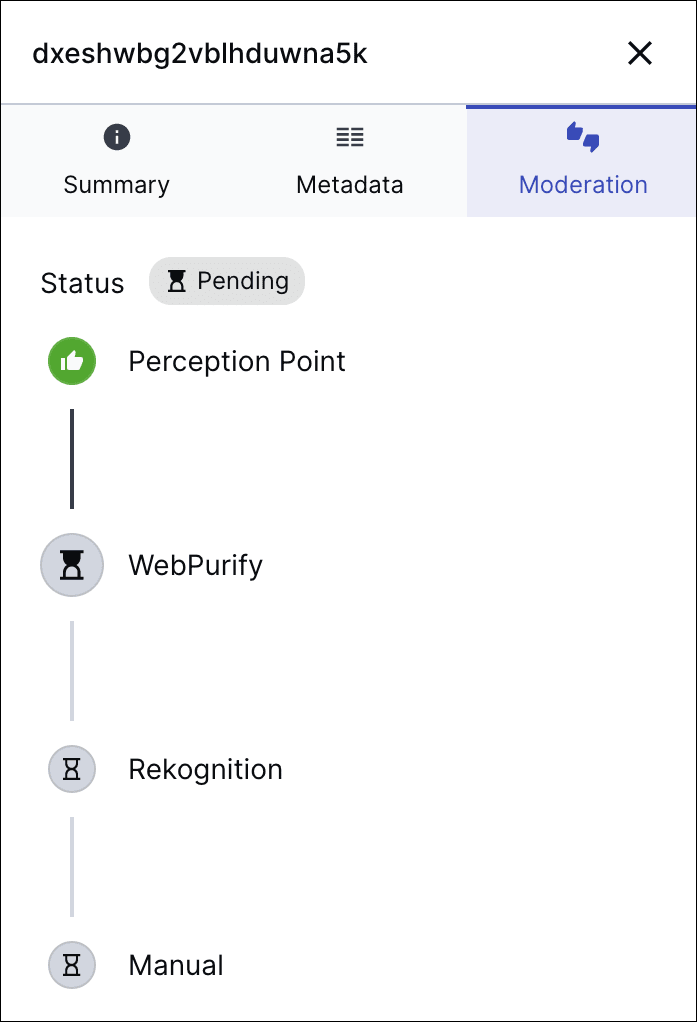
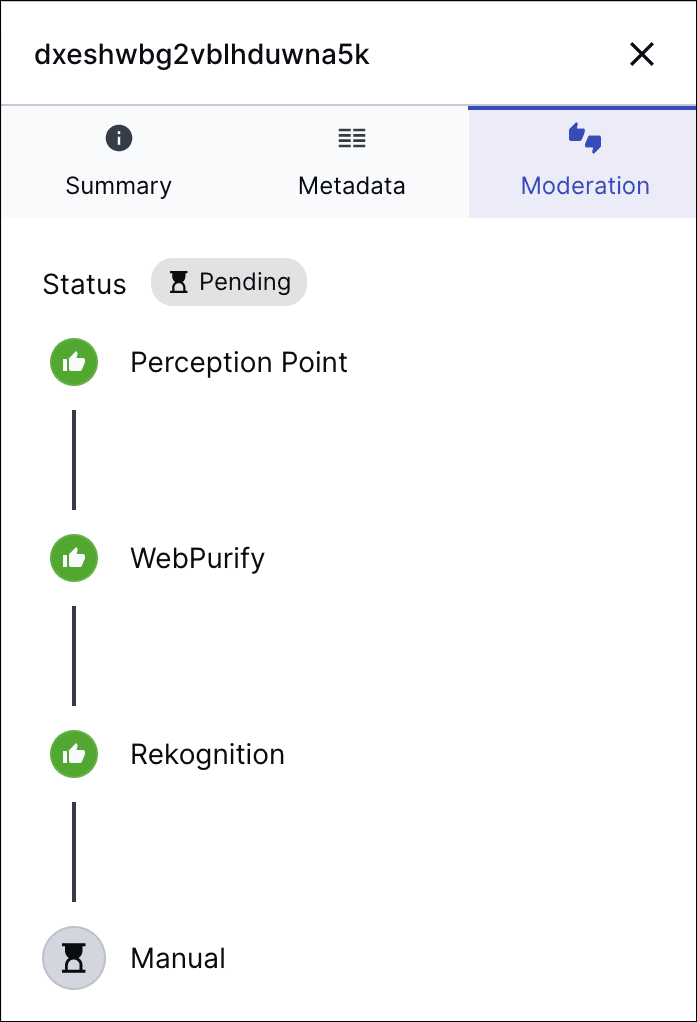
You can view an asset's moderation history to visually track its progress through the moderation process:
- While moderation is in progress: you can find out which moderations have been applied, which is currently being applied, and which are pending.
- If an asset's final status is resolved: you can find out which moderation accepted or rejected the asset, and if any moderations weren't applied.
To view an asset's moderation history:
Once you've opened the moderation page and found the asset you're looking for either:
- Double click the asset to open the Management drill-down and select the Moderation icon. OR
- Select the asset and open the Preview Pane, then click the Moderation tab.
See how the moderation changes after each moderation is applied:
Reviewing assets manually
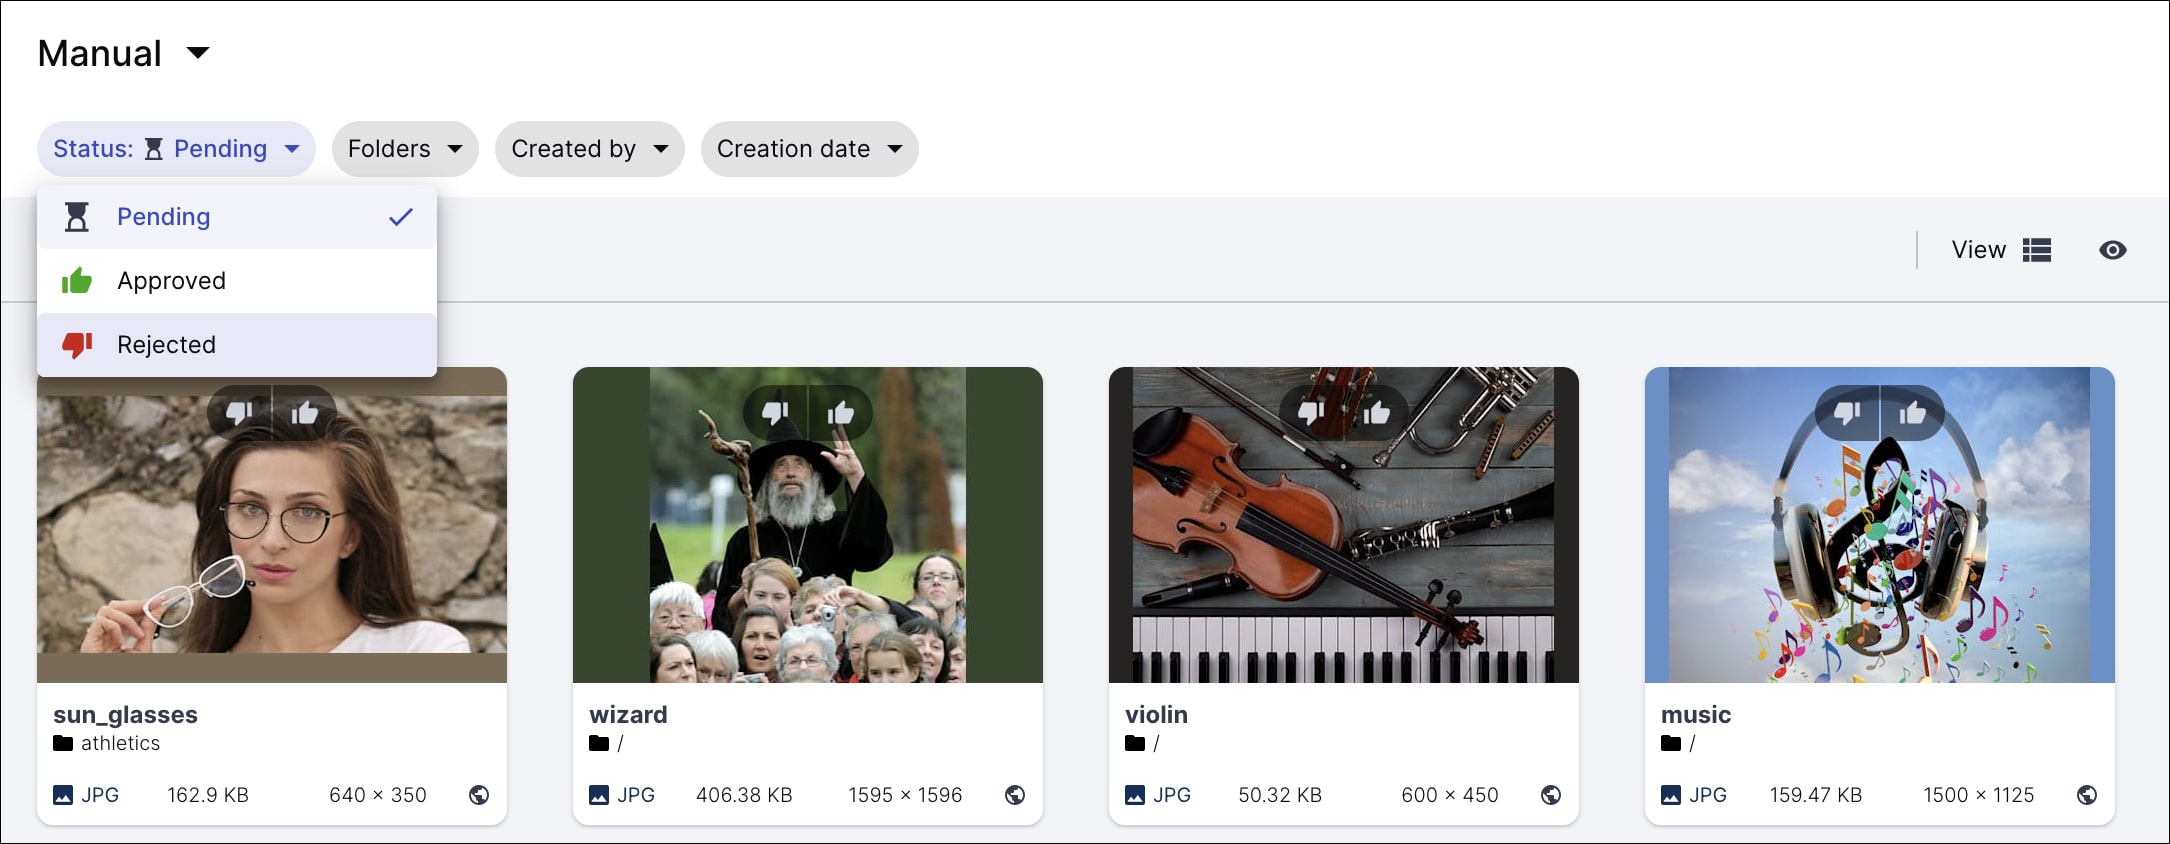
Users with Master admin, Media Library admin, and Technical admin roles can moderate assets. Additionally, Media Library users with the Moderate asset administrator permission can moderate assets in folders that they have Can Edit or Can Manage permissions to. You can view all moderated assets from the Moderation page and filter assets by moderation type and decision status.
Manual moderation: When manual moderation is enabled, assets are marked as Pending after upload and are displayed on the Moderation page, where a moderator reviews them and decides whether to accept or reject based on the content.
-
Automatic moderation: You can also view assets marked for automatic moderations on the Moderation page, along with their decision status.
- You can manually override automatic decisions, such as approving a rejected image or rejecting an approved one.
- If you manually approve or reject an asset, it will be considered manually moderated, even if it was initially flagged by automatic moderation. The asset will then appear under the Manual filter.
-
Multiple moderation: As each moderation type is applied and resolved, the asset’s moderation status changes.
- You can manually override moderation decisions for assets marked for multiple moderations, as well.
- You can also view the asset’s moderation history to track this progress
For more information see Applying multiple moderations.
- From the Product Navigation menu, select Moderation.

- Browse the assets. Use the filters to select the moderation type and status of the assets you want to review.
To find assets marked for multiple moderations:
- While the asset is being processed, filter pending assets under the moderation type currently applied.
- If the asset's final status is rejected, the asset will be found under the moderation type that rejected it.
- If the asset's final status is accepted, the asset will be found under the last moderation type that was applied.
- If the final status was determined manually, the asset will be found under Manual moderation, regardless of whether the asset was originally marked for manual moderation.
- Decide to accept or reject them.
Add-ons
You can register for a variety of add-ons that offer unique image and/or video processing or delivery capabilities, including celebrity recognition, automatic tagging, background removal, and asset moderation. Some of these add-ons are based on advanced Cloudinary AI functionality and others provide special functionality from a variety of vision and media processing partners. The add-ons are simple to use and fully integrated into Cloudinary's image and video management pipeline.
Registering for add-ons
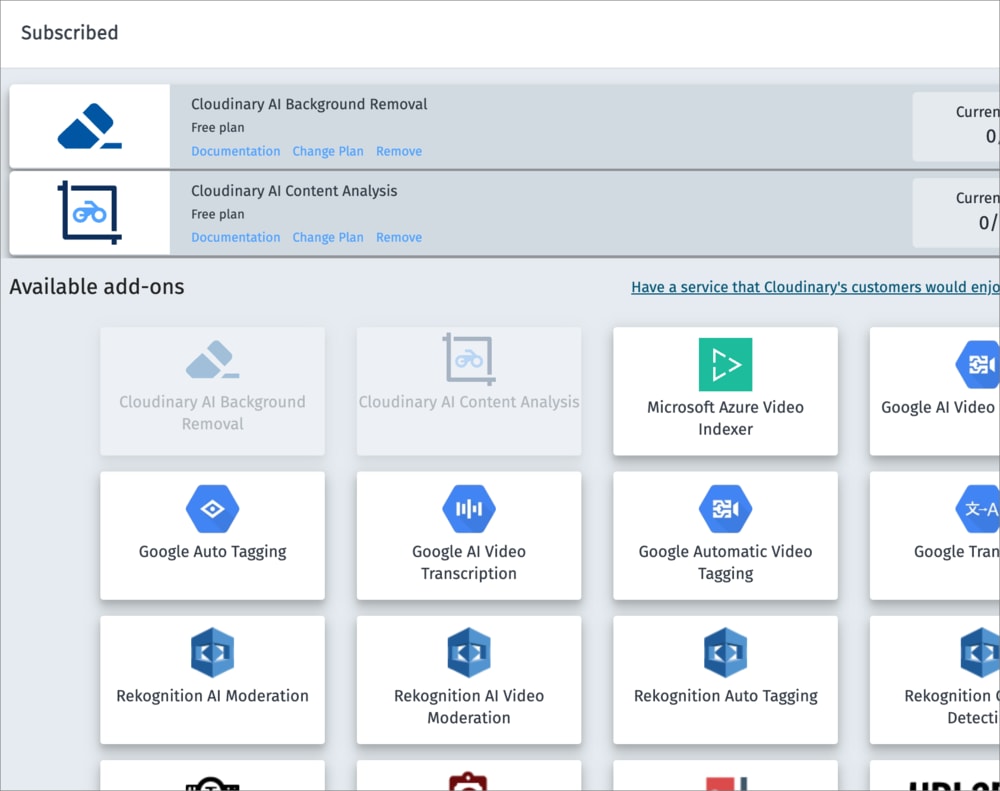
You can see a full list of the add-ons that you can register for and decide which ones best suit your needs.
- Most add-ons provide a Free plan with a small monthly quota. In most cases, you can register for these, even when on a Free plan.
- Paid add-on plans with a larger monthly quota require a Cloudinary account on a paid plan.
- You can view your add-on subscriptions and current usage in the Add-ons page in the Cloudinary console.
- Some third-party add-on plans require that you review and accept their terms of service.
To register for add-ons:
- Navigate to the Add-ons page of the Console Settings.

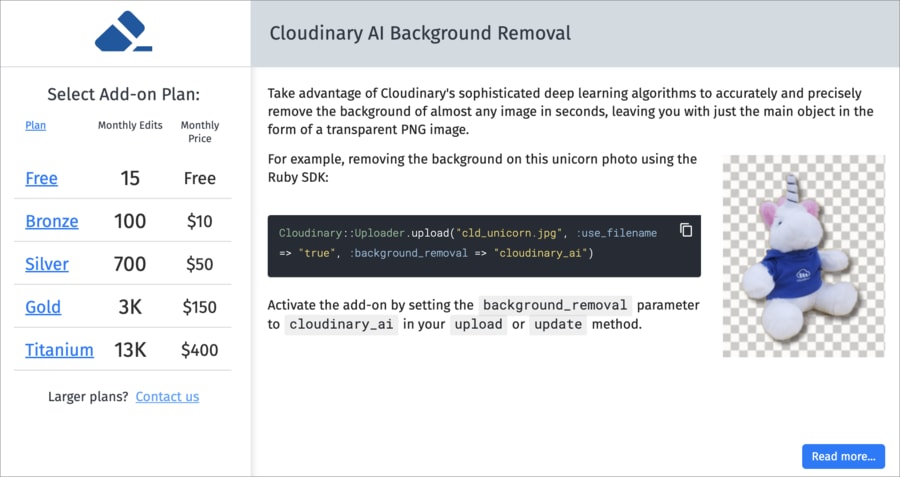
- Click any add-on in the Available add-ons list to view its card and read its description.

- To register, select a free or a paid plan. Make sure the plan you select has the capacity to handle your expected volume.
Applying add-ons using upload presets
You can enable users to apply add-ons to assets on upload by configuring an upload preset, as a set of predefined options that streamline the upload process by automatically applying specified actions or configurations to uploaded assets. You can either create a new signed upload preset or edit an existing one to include the activation of one or more add-ons.
Users can apply upload presets selectively during upload, such as removing background for specific use cases. However, if you want the preset to be applied to all future image or video uploads by default, such as enforcing auto-tagging or moderation, add the add-on option into your existing Media Library upload preset default for images, videos or both, as appropriate. Alternatively, set the relevant newly created upload preset as the default.
To activate an add-on:
- Go to the Upload Presets page of the Console Settings, then add a new preset or edit an existing one.
- Select the Addons tab and choose your desired add-ons. In some cases, you may have a few sub-options you can optionally select for an individual add-on.
- Make sure you're already registered for any add-on you enable.
- For a complete list of all available add-ons, see Add-ons.
Special configuration for AI captioning
AI captioning is one of several features available with the Cloudinary AI Content Analysis Add-on.
Similar to other add-ons, you activate it in your upload preset by turning on the AI captioning sub-option under Cloudinary AI Content Analysis in the Upload Presets Addons tab.
However, if you'd like to store the generated captions in an asset metadata field so that you can view or edit it from the Media Library, you need to also add a special custom configuration in the On success script section of the Advanced tab of your upload preset.
For example:
-
To add the generated caption to the relevant assets' Title (caption) contextual metadata field and add the value
autocaptionto the assets' tags, add the following On success script code: -
To add the caption to a previously created structured metadata field called Caption (whose
external_idisauto_caption) and add the valueautocaptionto the assets' tags, add the following On success script code:
Using add-ons
You can apply add-on functionality to assets during uploads using upload presets. For example, you can set automatic tagging or background removal for all assets uploaded using a specific upload preset.
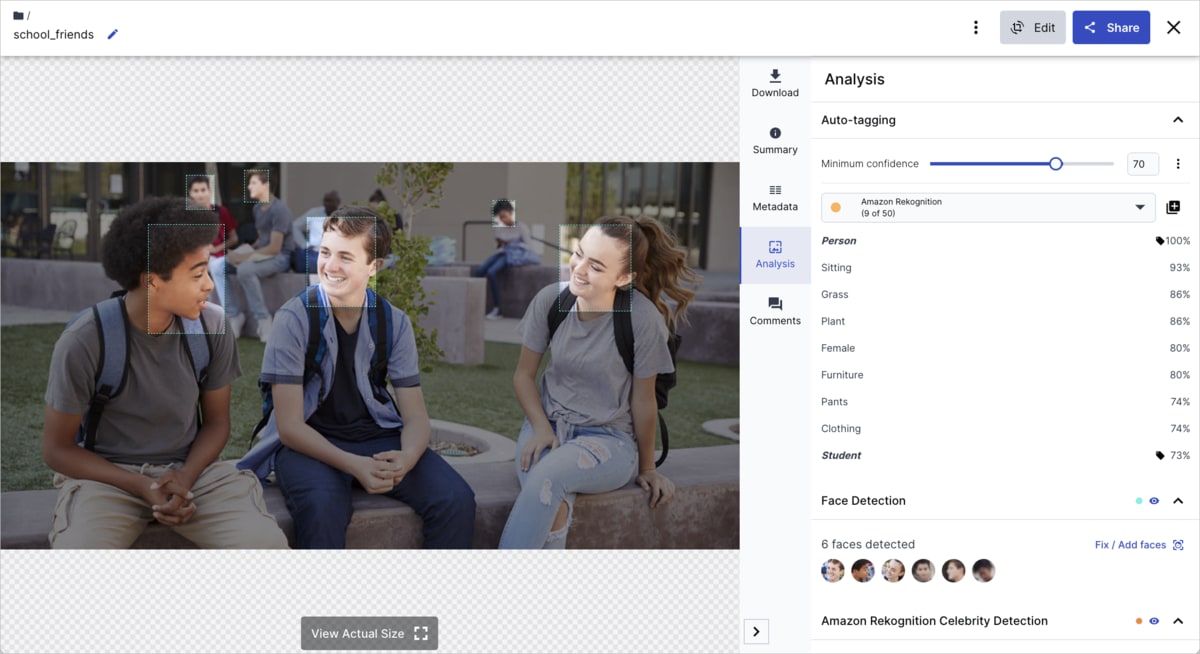
In addition, users can apply some add-ons to assets that are already in the Media Library from the Analysis tab of the Manage page. Others can be applied using Studio.
For more information on applying the add-ons, see Add-ons in the User Guides.
For example, below is an example of applying auto-tagging from the Analysis tab of the Manage page:
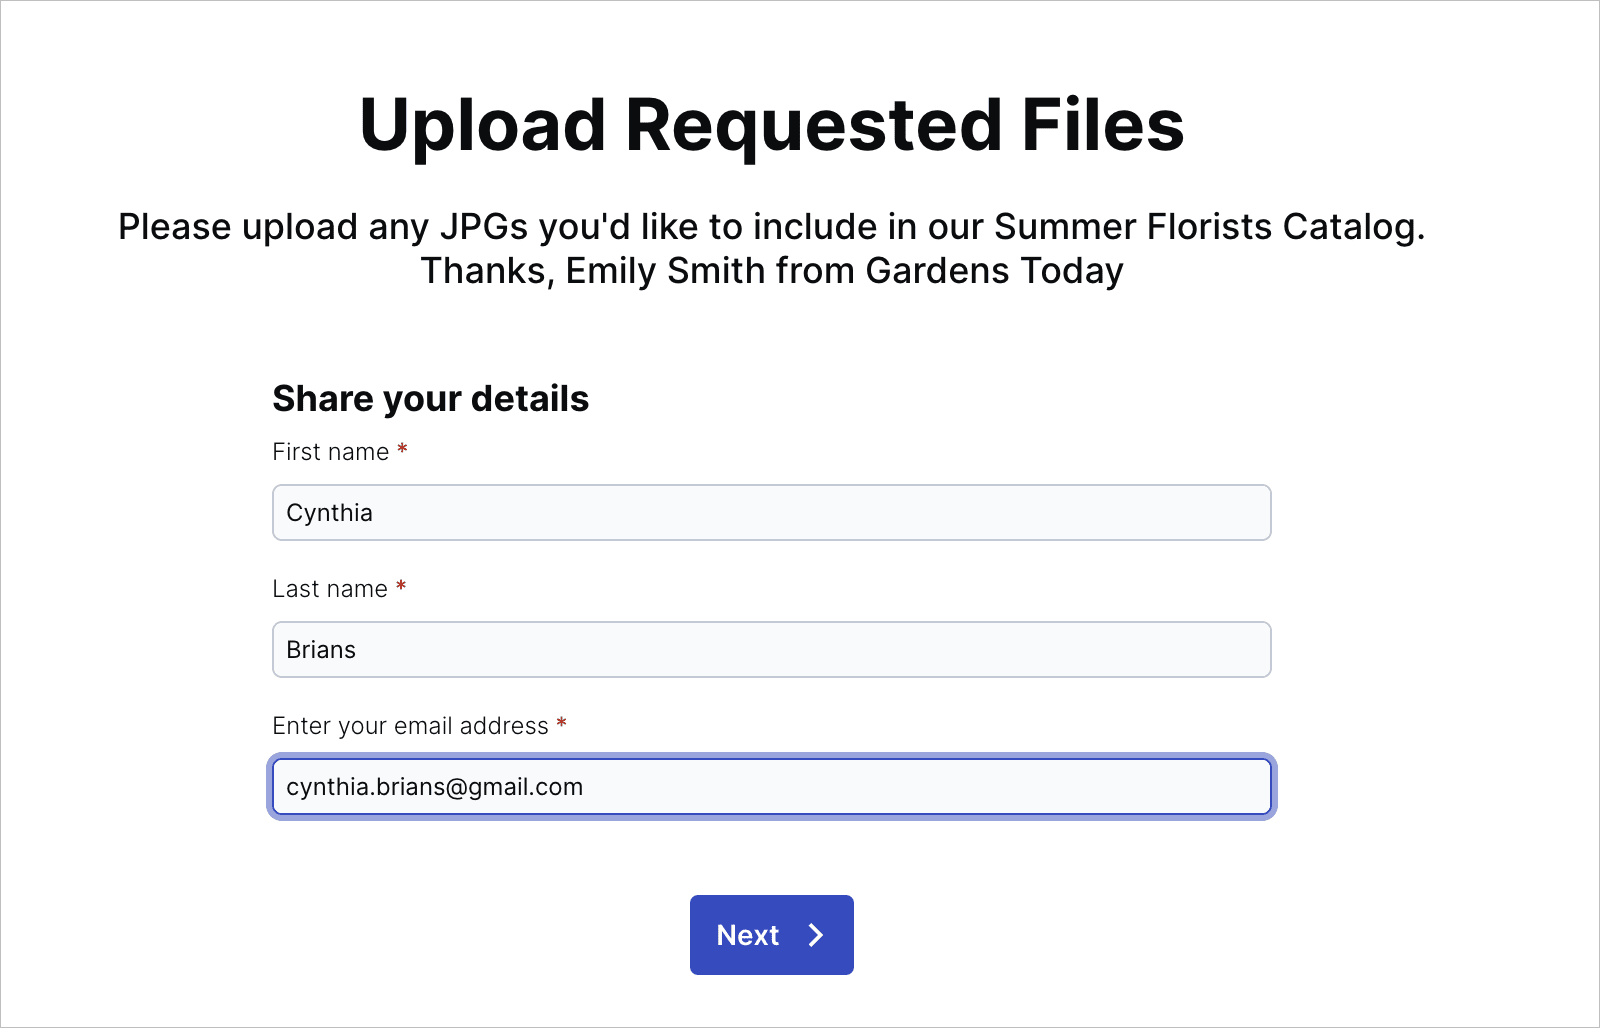
Requesting external uploads (Beta)
To facilitate collaboration with external stakeholders, administrators can generate a public link, offering external upload access to a selected folder. Share the link to provide a friendly user interface for uploading files directly to a specific folder for immediate use. Each uploaded asset will include a contextual metadata field with External uploader as the key and with its value containing the first name, last name, and email address entered by the external stakeholder during the upload process.
To generate an external upload link:
- Go to the desired folder. Consider using a dedicated folder for easy tracking of external uploads.
- In the folder's (3-dots) options menu, select Request Uploads, click Create Link, and fill in fields, including a description and expiration date. Specify file requirements in the description and consider providing details for the team contact.

- Send or have a teammate send the link to the external stakeholder, including configured details. This is what they'll see:
To reuse or edit the external upload link:
- Access the link through the Request Uploads option in the folder's (3-dots) options menu anytime for copying or editing.

