Media access methods
Last updated: Apr-23-2025
When storing images, videos or other files in Cloudinary, both the originals and their transformed versions are publicly available through a CDN, by default. You can use randomly generated public IDs for your assets, which makes it harder for end users to guess your media URLs, but you may want more formal ways to control who can access your media files and when.
| Feature | Description |
|---|---|
| Strict transformations | Prevent transformations from being dynamically applied to media assets, except for any transformations that you specifically allow to be used dynamically, or that you have generated using an allowed method (eager, signed, allowed referral domain). |
| Signed delivery URLs | A signed Cloudinary delivery URL is a delivery URL that has its signature validated before making it available for view. |
| Private media assets | Original assets are only accessible by a signed URL. |
| Authenticated media assets | Original assets and their asset derivations are only accessible through signed URLs. |
| Access controlled media assets | Another layer separate from delivery type (upload / private / authenticated). Access-controlled assets can only be viewed with an access token, except during an optional time-limited date range when the asset is defined as publicly accessible. |
| Token-based access (premium feature) | Assets can be secured so that even if someone has the delivery URL they still need a token to access the asset. Tokens can be restricted to a specific time frame, IP address, a specific pattern ACL (Access Control List) or even a specific user (session cookie). |
| Allowlisting or blocklisting access to your product environment's assets (premium feature) | Configure an Access Control List (ACL) to control who can access your assets based on their country, IP address, the path segment of the request URL, content type, Referer and User-Agent. |
Strict transformations
Cloudinary's transformation URLs are dynamic, which means that if the requested transformed asset doesn't already exist, then Cloudinary creates it on the fly. This is a powerful feature, but you may not want your end users to play with these options on your assets, as each new transformation counts towards your monthly transformation counts quota.
To prevent transformations from being dynamically applied to media assets, you can set the Strict transformations setting to Enabled in the Security page of your Cloudinary Console Settings.
When you enable strict transformations, you can generate new transformations only in the following ways:
- Define specific allowed transformations that you can apply to any asset on the fly
- Define specific allowed referral domains that can generate unauthenticated on-the-fly transformations
- Generate transformations with an authenticated request using a signed delivery URL
- Generate transformations eagerly during upload or update API calls.
Define allowed transformations
Once you've enabled strict transformations for your product environment, you can allow specific transformations either using the Admin API or the UI.
Using the Admin API
Using the update transformation method of the Admin API, set allowed_for_strict to true for the transformation you want to allow.
For example, allow a transformation by name (here, on_sale_overlay is a named transformation):
Or, allow a transformation by parameter listing:
\ or ", for example, \"text\" or ""text"".Using the UI
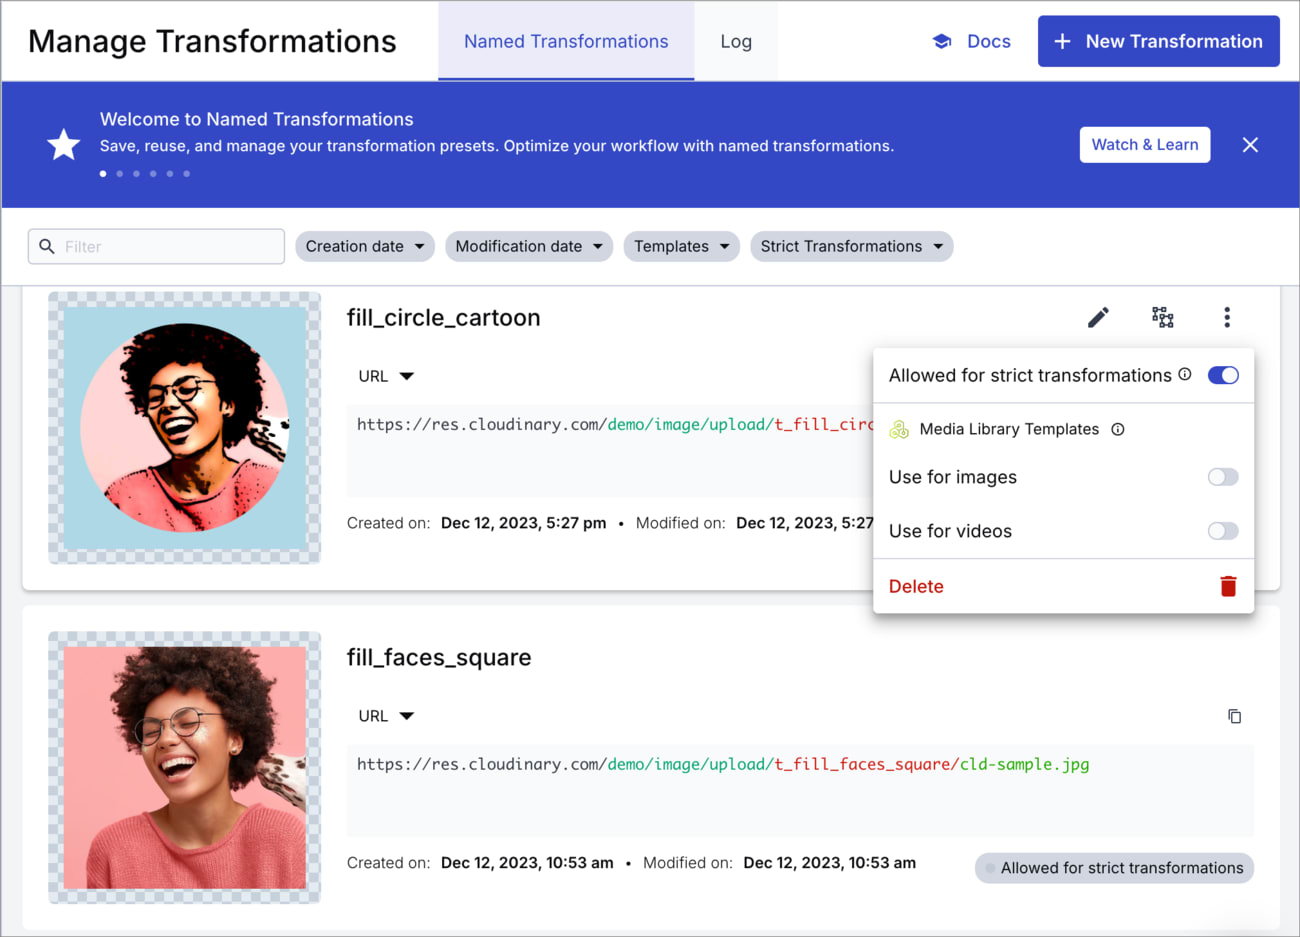
Open the Manage Transformations page of the Console. To access the page:
- If you have the new App Console, the page is part of the Image product: Image > Manage Transformations .
- If you have the Classic Console, go to Programmable Media > Manage Transformations.
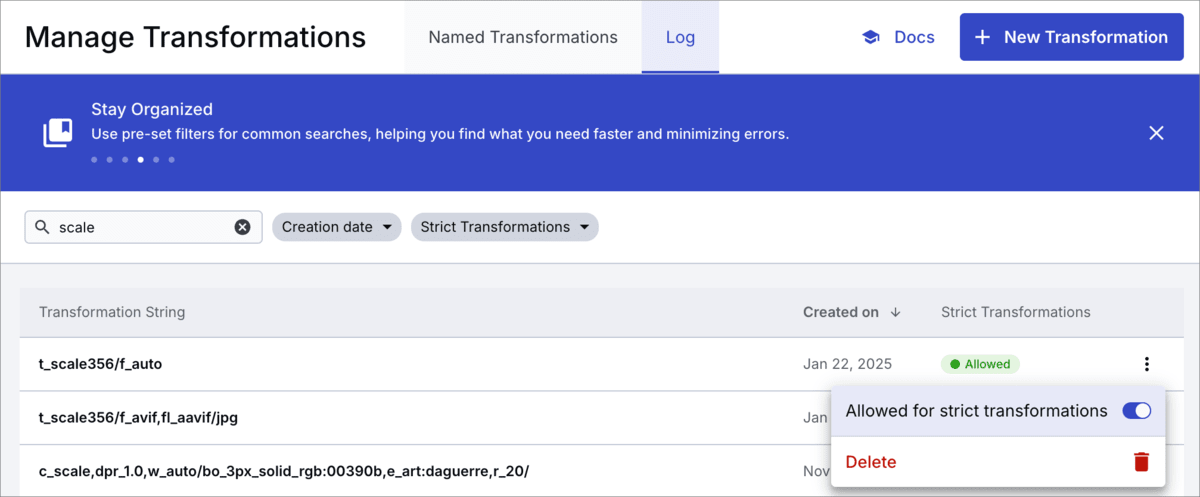
You can find your transformations listed in both the Named Transformations or Log tabs.
For each relevant transformation, open the kebab menu and toggle the Allowed for strict transformations option.
Once allowed for strict transformations, you can use the transformation on any asset to generate and deliver the transformed version of that asset on the fly.
For transformations that aren't allowed, if you try to apply the transformation to an asset you'll see a 404 error.
Unique transformations
Some transformations deliver the same result, but aren't seen as identical by Cloudinary. Therefore, ensure you allow each variation of a transformation as required. Here are some examples where you may think the transformation is the same, but Cloudinary sees it as a different transformation:
- If the order of the transformation parameters changes. For example,
w_300,c_scaleis considered a different transformation toc_scale,w_300, even though the delivered media looks the same. - If the file extension is different. For example,
.jpgis considered a different transformation than.jpeg, or a JPEG file with no extension specified, even though a JPEG file is the delivered format in each case. - Whether or not the file format is specified as a transformation. For example, specifying
f_jpgas a transformation parameter for a JPEG file is considered a different transformation than delivering the same transformation with a.jpgextension, even though a JPEG file is delivered in each case.
Using automatic format in strict transformations
You can specify f_auto (automatic format) in a transformation that you want to allow when you have strict transformations enabled because Cloudinary allows all format variations for the transformation in this case.
You can't use f_auto directly within a named transformation, so you need to combine f_auto and your named transformation, and then allow that transformation.
Here's one way to do that if you already have strict transformations enabled:
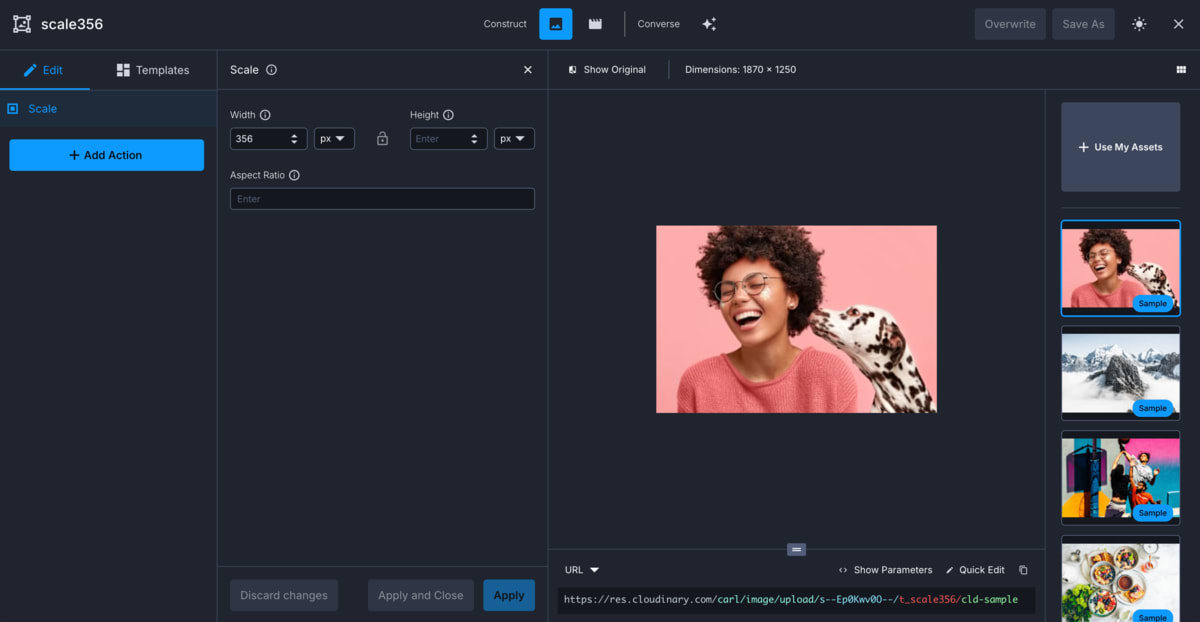
- Create a new transformation using the Transformation Builder. Save the transformation as a named transformation. In this example, it has the name
scale356. Notice that the builder signs the delivery URL if you've enabled strict transformations.

-
Use the Cloudinary CLI to create a signed URL for that named transformation together with the
f_autoparameter. You can use any asset; in this example we usecld-sample-5.jpg: -
The CLI returns a signed URL, but doesn't create the derived asset. To create the derived asset, causing the
t_scale356/f_autotransformation to be visible in the Log, use a cURL command to request the derived asset, for example: You'll then see the transformation
t_scale356/f_autopresent in the Log, which you can allow for strict transformations.
Allowed strict referral domains
You can use the Allowed strict referral domains setting to set the referrer domains that you want to permit to generate unsigned transformations on the fly, even when you've got strict transformations enabled. Specify the domain(s) in the Security page of the Cloudinary Console Settings. Separate multiple domain entries with a newline.
Signed delivery URLs
A signed Cloudinary delivery URL is a delivery URL that has its signature validated before making it available for view (see the article about on-the-fly image transformations secured with signed urls for more details). Signed delivery URLs are generally used to:
- Deliver specific derived assets when strict transformations are enabled
- Apply add-on based transformation directives that require signing the URL
- Fetch assets from specific URLs when "Fetched URLs" are restricted
- Allow access to private/authenticated assets
A signed delivery URL contains a signature component of the format /s--SIGNATURE--/. The signature is automatically generated by Cloudinary's backend SDKs by adding the sign_url boolean parameter to the helper method and setting it to true (you can manually generate a signature by taking the first 8 characters of a base64 encoding of an SHA digest of a 'public_id/transformation' string concatenated with your API secret. See Generating delivery URL signatures for more information).
signature_algorithm SDK configuration parameter to sha256. If you want to limit your account to allow only the SHA-256 digest for all your validations, submit a request.For example, to create an image tag for the authenticated image secret_couple resized to a height and width of 300 pixels using the fill resize mode, while signing the transformation URL using the first 8 characters of an SHA signature.
And the same for a video tag, using the same transformations:
Once a derived image or video has been generated (whether dynamically on first access or eagerly during upload), the signature checking is skipped and the signature itself can be omitted (except for Authenticated assets, which always require either a signature or another access token).
See also: Delivery URL signatures.
Private media assets
You can upload images and videos as private to restrict access to the original asset and only allow access to derived (transformed) versions of the asset. You can access the original asset only with a signed URL, but by default, all derived versions of the asset are accessible. To deliver a transformation of an asset uploaded as private, set the type parameter in the delivery URL to private (instead of the default upload).
An asset that you uploaded as 'private' can't be accessed publicly without a signed URL. For example, the following delivery URL for the sample image returns an error:
https://res.cloudinary.com/demo/image/private/sample.jpg
Delivering any derived versions of the image is still possible. For example, the sample private image with a width of 300 pixels:
https://res.cloudinary.com/demo/image/private/w_300/sample.jpg
By default, all derived versions of the asset are accessible, but you can also restrict the generation of derived assets by activating the Strict Transformations mode.
Providing time-limited access to private media assets
You can make a private original asset temporarily accessible (for example, to enable a customer to access a stock photo on your site after purchasing it) by generating a time-limited and signed URL with the private_download_url method of the Cloudinary API. For example, to generate a link to the my_picID original image in JPEG format:
This generates a link similar to the following:
https://api.cloudinary.com/v1_1/private-demo/image/download?api_key=824698761754661&format=jpg
&public_id=my_picID&signature=d994c2b972c30d84d33fde684aa377fc17878be6×tamp=1346076992
The generated URL delivers the image via a secure authenticated API request to Cloudinary each time. The image is not cached on the CDN.
Required parameters
-
public_id- The identifier of the uploaded asset. -
format- The asset file format.
Optional parameters:
-
resource_type- The resource type (image,videoorraw) of the file to deliver. Default:image. -
type- The delivery type of the file to deliver. Possible values: upload, private, authenticated, Default: private. -
expires_at- The date (UNIX time in seconds) for the URL expiration. Default: 1 hour from the time the URL is generated. -
attachment- If true, the URL downloads the image as an attachment. Otherwise, the image is displayed. Default:false.
Authenticated media assets
Images and videos can be stored with an authenticated delivery type.
The authenticated delivery type is an element of the URL. Therefore, an asset uploaded with this type is always an authenticated asset. Changing the type also requires changing the delivery URL, which can be done using the to_type parameter of the Rename method.
When an asset is set as authenticated, access to both the original asset URLs and all derived (transformed) versions of the asset are restricted. These assets and their derived versions can't be accessed without some form of authentication. This authentication can take one of the following forms:
-
Signed-URL authentication - Only for assets using the
authenticateddelivery type. - Token-based access (premium feature)
- Cookie-based access (premium feature)
Access-controlled media assets
Restrict access to your assets on an individual basis by restricting access to the asset to a specified time frame. If the current date does not fall within the time frame defined then the asset needs a token to be delivered.
You can restrict the access to your assets by passing the access_control parameter when uploading or updating assets. The parameter accepts an array of access types for the asset, and the asset is accessible as long as one of the access types is valid. Possible values for each access_type in the array:
-
token- Requires token based access to access the asset. -
anonymousallows public access to the asset. The anonymous access type can optionally include start and/or end dates (in ISO 8601 format) that define when the asset is publicly available. You can only include a single 'anonymous' access type in the array.
For example, to restrict an asset as requiring token based access except for the period from the 15th of December 2022 until the 20th of January 2024 when it will be publicly available:
\ or ", for example, \"text\" or ""text"".Token-based access (premium feature)
The token-based access feature allows you to restrict the validity of your asset delivery URLs and give access to your assets. This is also the only way to access any assets with an access_control value of 'token'.
The validity of the token can be restricted in the following ways:
- To a specific time frame or expiration date
- To a specific IP address
- To a specific pattern ACL (Access Control List)
- To a specific user (session)
The access token can be used in one of 2 ways:
- Added as query parameters to a delivery URL, when generating the URL with one of Cloudinary SDK URL creation methods. See Delivering token-based media assets
- Set as a cookie so that only users with a valid cookie have access. See Cookie-based access
The basic features of each of the access options are summarized in the table below:
| Signed URL | Token | Cookie | |
|---|---|---|---|
| Time limited | No | Yes | Yes |
| IP restriction | No | Yes | Yes |
| User-session limited | No | No | Yes |
| Pattern-based access (ACL) | No | Yes | Yes |
| Customizable access per image | No | Yes | Yes |
| CDN Caching | Yes | Yes | Yes |
| Plan availability | Free | Advanced | Advanced |
| Setup required | No | Yes | Yes |
| Custom delivery hostname (CNAME) required | No | No | Yes |
Delivering token-based media assets
The Cloudinary SDKs provide methods for creating delivery URLs (e.g., cl_image_tag and cl_video_tag in Rails). To create a token-based access URL for the asset, add the sign_url parameter (set to true) and the auth_token parameter to the SDK method. The auth_token parameter includes the following set of parameters:
-
key– (Required) - the token must be signed with the encryption key received from Cloudinary. -
acl– (Optional) – an Access Control List for limiting the allowed URL path to a specified pattern (e.g., /video/authenticated/*). The pattern can include any of Cloudinary's transformations to also apply to the delivered assets, and restrict access to a specific path, or even to a specific asset. Note that if you add an overlay (e.g., for a watermark), you should also include the fl_layer_apply flag to ensure the layer can't be modified. This parameter is useful for generating a token that can be added to a number of different URLs that share a common transformation. Without this parameter, the pattern defaults to the full URL path of the requested asset. -
ip– (Optional) - only this IP address can access the resource. -
start_time- (Optional) - timestamp of the UNIX time when the URL becomes valid. Default value: the current time. -
duration– (Optional)1 – the duration that the URL is valid in seconds (counted from start_time). -
expiration- (Optional)1 - timestamp in UNIX time when the URL expires.
1 Either duration or expiration must be provided (if both are provided, duration is ignored).
Example 1: To create a token-based access URL that restricts access to the sample authenticated image for 5 minutes and is signed with 'MyKey':
Example 2: To create a token-based access URL that restricts access to the dog authenticated video until 1/1/2018 (1514764800 in UNIX time) and is signed with 'MyKey':
Cookie-based access (premium feature)
The cookie-based access feature allows you to restrict the delivery of assets, so that only users with a valid cookie have access.
Creating the access cookie
An access cookie needs to be created for restricted assets with the generate_auth_token method that accepts the following variables:
-
key– (Required) - the cookie must be signed with the encryption key received from Cloudinary. -
acl– (Required) – an Access Control List for restricting the allowed URL path to a specified pattern (e.g., /video/authenticated/*). The pattern can include any of Cloudinary's transformations to also apply to the delivered assets, and restrict access to a specific path, or even to a specific asset. Note that if you add an overlay (e.g., for a watermark), you should also include the fl_layer_apply flag to ensure the layer can't be modified. This parameter is useful for generating a cookie that can give access to a number of different URLs that share a common transformation.
You can set multiple Access Control List patterns by passing them as an array of values. -
ip– (Optional) – a specific IP Address that can access the assets. -
duration– (Optional)1 – the duration that the cookie is valid in seconds. This value should be set reasonably, making sure to update the cookie as frequently as needed according to the desired session (e.g., matching the session expiration). -
expiration- (Optional)1 - timestamp in UNIX time when the cookie will expire. -
start_time- (Optional) - timestamp in UNIX time when the cookie becomes valid. Default value: the current time.
1 Either duration or expiration must be provided (if both are provided, duration is ignored).
Example 1: To create a cookie that's valid for 5 minutes (300 seconds), allows access to all authenticated images, and is signed with MY_KEY:
Example 2: For allowing access only to authenticated videos that are delivered with a specific named transformation (t_authorized):
The named transformation may add a watermark with the name of the employee, group or role who is accessing the image. In this case, a named transformation should be created via the Cloudinary Console for every user, group or role (respectively).
Example 3: For allowing access only when the name of the user is applied as a text overlay on the image:
So the following URL will be allowed (assuming the current user is John Smith):
But if a different user's name is applied, it won't match the cookie contents and will be unauthorized.
Example 4: For allowing access to authenticated images and videos, where their public IDs start with 'eyes_only', only when the red, bold, 50 pixel sized text 'Confidential' is added as a text overlay:
Cookie placement
The cookie token returned from the generate_auth_token method is a string that includes the cookie name (always __cld_token__) and its value, for example:
Set the cookie on your main domain, e.g., app.customer.com or on the sub-domain that points to Cloudinary, e.g., images.app.customer.com.
Allowlisting or blocklisting access to your product environment's assets (premium feature)
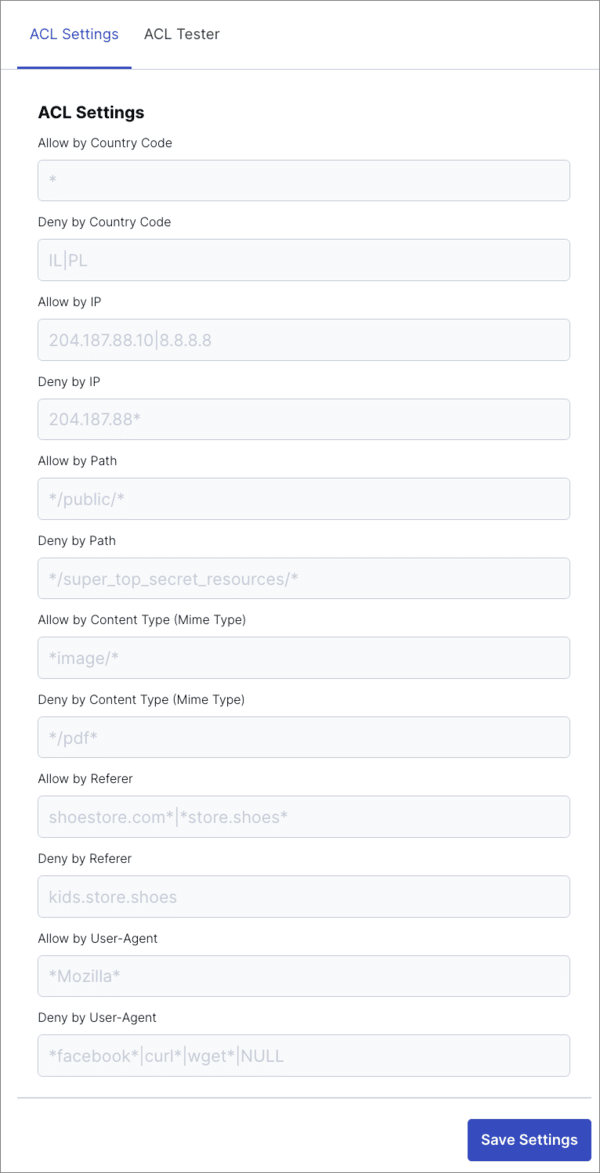
For each product environment, you can configure an Access Control List (ACL). This controls who can access your assets based on their country, IP address, the path segment of the request URL, content type, Referer and User-Agent.
To configure the ACL, navigate to the Delivery page of the Console Settings and set the ACL Settings.
- Use
*to match any number of characters at the start, middle or end of a string. - Use
|to separate optional matches (OR operand). - Use
!to specify exceptions (NOT operand). - Use
NULLfor testing non-existent Referer and User-Agent strings.
The conditions are tested in the following order:
- If any of the ALLOW conditions match, the request is allowed and none of the DENY conditions are considered.
- If none of the ALLOW conditions match, the DENY conditions are considered.
- If any of the DENY conditions match, the request is denied, otherwise it’s allowed.
You can test out the logic by setting values in the ACL Tester tab.


